Folder Size Issues in Windows 10
Recently, many Windows users reported an issue about folder size not showing in Windows 10. For instance, there is a 2GB folder, but its size doesn’t show in Windows Explorer, or it shows an incorrect file size. If users choose to rename the folder, then folder size will be along changed, but still not the correct size.
If you are the one of these users, please go on reading to get to know how to fix folder size not showing error in Windows 10.
In fact, the main cause for this error is Windows 10 itself. There is a bug coming along with the newest Windows Updates. The bug affects Windows Explorer reading metadata of a file correctly, which leading to error.
There is a piece of good news that in the upcoming Windows Updates, a fix will be released to solve this bug. However, if you don’t want to wait for the updates, please take a look at following solutions to get the problem solved.
How to Solve Folder Size Not Showing Windows 10
Here are 5 ways focusing on how to show folder size correctly in Windows 10.
Method 1. Use File Explorer to Check Folder Size
It is possible folder size will not show in File Explorer because it costs extra time to process and calculate the size of a large-sized folder. But you can show a folder size just by adjusting a setting in File Explorer.
Please do it in this way:
- Step 1: Open File Explorer. Go to directory containing folders.
- Step 2: Click View tab in toolbar. Then, click Options.
- Step 3: In Folder Option window, shift to View tab.
- Step 4: Under Advanced settings, check if Display file size information in folder tips option is ticked.
- Step 5: Click OK to save the changes.

After doing that, you can hover your mouse to target folder to see whether the folder size is visible.
Method 2. View Folder Size in Folder Properties
Checking properties is another way to know the size of a particular folder in Windows 10.
It’ s easy to make it.
- ① In File Explorer, locate the target folder.
- ② Right click it and choose Properties from menu.
- ③ Under General tab, you can see detailed information, including size, as well as type, location, size on disk and creation date and so on.

Method 3. Try System File Checker
The System File Checker (SFC) is a Windows inbuilt utility that can replace corrupted system files (might be the cause for incorrect size) with normal system files. Please follow these steps to have a try.
- ① Press Win + R keys together. Type cmd and tap Enter.
- ② In Command Prompt window, type sfc /scannow and press Enter.
- ③ Then, the command will scan all protected system files. Results will be listed after the process ends.
Way 4. Show Folder Size with CMD
In Command Prompt, you can run a command to check size in Windows 10. Here is a guide below.
- Step 1: In Command Prompt, type dir /s “folder path” and press Enter, such as dir /s “C:\Users\mini\Desktop\pics”.
- Step 2: Then, files and subfolders in pic folder will be listed. At the end of the list, you can see the total size of all files and folders in pic. That’s the file size of pic folder.

Way 5. Utilize Professional Folder Size Software
When you find Windows 10 Issues, you can choose some reliable third-party software to show size. Here are 3 candidates.
TreeSize
TreeSize is a free Windows disk space analyzer. This program can scan drives in computer in seconds and display drives and folder sizes. Except for internal drives, TreeSize can also check size on external hard drive.
Folder Size
Also scan your hard drives and show file sizes to let you have an idea of disk space distribution. You are allowed to scan the whole drive or a chosen folder, with the result of detailed information for files and folders.
Folder Size Explorer
Explorer is also a free and practical tool, which can calculate and display folder sizes on Windows 10 File Explorer. With it, you can see what directories take up the most disk space.
How to Sort Folders by Size on Windows
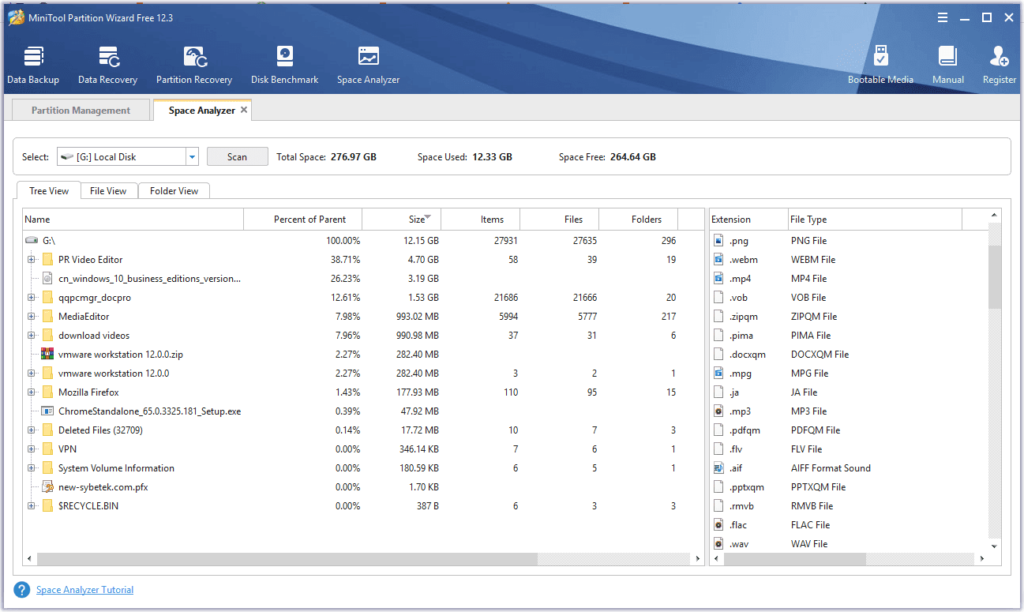
To sort folders by size, you are suggested to make use of a tool – MiniTool Partition Wizard, a popular and free disk manager for Windows. With its Space Analyzer function, you will see how disks are being used. At the same time, it will show you all files of a drive in Tree View, File View, or Folder View. You can choose the unnecessary files or folders to delete on the list to free up disk space.
Now, you can follow the tutorial below to begin the work.
- Step 1: Install Partition Wizard and run it to get the main interface.
- Step 2: Click Space Analyzer tab on the top. Select a drive to scan by clicking Scan.
- Step 3: When scanning process is over, you can see the disk space distribution and a Size column showing detailed size of each file. Then, you can sort folders by size.
- Step 4: For more operations on the files and folder, just right click on each single one, and then, you can choose to delete, open properties or copy its path, etc.

To Sum Up
That’s all common solutions to Size Issues g in Windows 10. You can show size by using not only Windows tools or settings, but also by adopting third-party software. Hope these tips can help you.
Do you have other better options or alternative ways to check size? You are welcome to share with us in the comment area below.
Also read about: How to Manually Check for Updates on Windows 10


